Axios源码解读
「这是我参与11月更文挑战的第4天,活动详情查看:2021最后一次更文挑战」。
Axios 介绍
Axios 是一个基于 promise 的 HTTP 库,可以用在浏览器和 node.js 中,支持特性:
- 从浏览器创建 XMLHttpRequests
- 从 node.js 创建 http 请求
- 支持 Promise API
- 拦截请求和响应
- 转换请求和响应数据
- 取消请求
- 自动转换
JSON数据 - 客户端支持防御XSRF
源码目录
├── /lib/                          // 项目源码
  └── /adapters/                     // 定义发送请求的适配器
      ├── http.js                       // node环境http对象
      ├── xhr.js                        // 浏览器环境XML对象
  └── /cancel/                       // 定义取消请求功能
  └── /helpers/                      // 辅助方法
  └── /core/                         // 核心功能
      ├──Axios.js                      // axios实例构造函数
      ├── createError.js               // 抛出错误
      ├── dispatchRequest.js           // 用来调用http请求适配器方法发送请求
      ├── InterceptorManager.js        // 拦截器管理器
      ├── mergeConfig.js               // 合并参数
      ├── settle.js                    // 根据http响应状态,改变Promise的状态
      ├── transformData.js             // 转数据格式
 └── axios.js                        // 入口,创建构造函数
 └── defaults.js                     // 默认配置
 └── utils.js                        // 公用工具函数
(一)从入口出发
axios 提供一个函数 createInstance 来辅助创建 Axios 类的实例。但是需要注意的,该函数返回的并不是 Axios 实例对象,而是实例对象的 request 方法,并且把实例对象的其它别名方法挂载到 request 方法上(函数也是对象,可以添加属性方法)。所以才有下面的用法:
axios({...});
axios.get('/', {...})
...
// 创建axios实例的方法
function createInstance(defaultConfig) {
  //根据默认配置生成axios实例
  var context = new Axios(defaultConfig);
  //创建实例,返回request函数,request中this指向context
  var instance = bind(Axios.prototype.request, context);

  // 把Axios原型上的方法继承到instance上,内部的bind使this指向指向context
  utils.extend(instance, Axios.prototype, context);

  // 拷贝上下文对象属性(默认配置和请求、相应拦截器对象)到实例上
  utils.extend(instance, context);

  // 创建实例的工厂函数,一般axios封装应该都会用到(我们把一些默认、公共的配置都放到一个实例上,复用实例,无需每次都重新创建实例)
  instance.create = function create(instanceConfig) {
    return createInstance(mergeConfig(defaultConfig, instanceConfig));
  };

  //返回实例对象
  return instance;
}

// 创建实例
var axios = createInstance(defaults);

//同时给导出的axios提供了一些其它方法:

// 挂载原始Axios类,可以用于继承
axios.Axios = Axios;

// 中断/取消请求的相关方法
axios.Cancel = require('./cancel/Cancel');
axios.CancelToken = require('./cancel/CancelToken');
axios.isCancel = require('./cancel/isCancel');
axios.VERSION = require('./env/data').version;

// 并发请求,完全是promise
axios.all = function all(promises) {
  return Promise.all(promises);
};
axios.spread = require('./helpers/spread');

// 用作监测是否为Axios抛出的错误
axios.isAxiosError = require('./helpers/isAxiosError');
//导出
module.exports = axios;

// 允许在TypeScript中使用默认导出
module.exports.default = axios;
当我们引用 Axios 库的时候,它会内部调用 createInstance 初始化并返回 request
我们可以发现,我们平常使用的axios() 和axios.create() ,都是调用createInstance 来创建实例的。
所以,我们可以通过工厂函数来创建另外一个 axios request :
 // 使用默认的 request
 axios.get('/user');

 // 使用新的配置发送请求
 let newRequest = axios.create({baseURL: 'http://localhost:9999'});
 newRequest.get('/user');
(二)Axios 类
Axios 类是最核心的类,封装并提供了请求所使用的 API 。
//Axios.js
function Axios(instanceConfig) {
  this.defaults = instanceConfig;
  this.interceptors = {
    request: new InterceptorManager(),
    response: new InterceptorManager()
  };
}
/**
 * 发送一个请求
 *
 * @param {Object} config The config specific for this request (merged with this.defaults)
 */
Axios.prototype.request = function request(config) {
  // Allow for axios('example/url'[, config]) a la fetch API
  if (typeof config === 'string') {
    config = arguments[1] || {};
    config.url = arguments[0];
  } else {
    config = config || {};
  }
  //合并配置
  config = mergeConfig(this.defaults, config);

  // 设置config.method
  if (config.method) {
    config.method = config.method.toLowerCase();
  } else if (this.defaults.method) {
    config.method = this.defaults.method.toLowerCase();
  } else {
    config.method = 'get';
  }

  var transitional = config.transitional;

  if (transitional !== undefined) {
    validator.assertOptions(transitional, {
      silentJSONParsing: validators.transitional(validators.boolean),
      forcedJSONParsing: validators.transitional(validators.boolean),
      clarifyTimeoutError: validators.transitional(validators.boolean)
    }, false);
  }
   //关键的链式调用,在文章后面具体解析....
};
Axios 基于 request 方法又提供了一些列 HTTP 方法的别名函数,并挂载到原型上:
 // Provide aliases for supported request methods
 // 针对不需要提交正文数据的请求封装处理
 utils.forEach(['delete', 'get', 'head', 'options'], function forEachMethodNoData(method) {
   /*eslint func-names:0*/
   Axios.prototype[method] = function(url, config) {
     return this.request(mergeConfig(config || {}, {
       method: method,
       url: url,
       data: (config || {}).data
     }));
   };
 });
 // 针对可以提交正文数据的请求处理
 utils.forEach(['post', 'put', 'patch'], function forEachMethodWithData(method) {
   /*eslint func-names:0*/
   Axios.prototype[method] = function(url, data, config) {
     return this.request(mergeConfig(config || {}, {
       method: method,
       url: url,
       data: data
     }));
   };
 });
(三)配置处理
在 Axios 中分别有三处配置点:
- 请求方法配置
- 实例配置
- 全局配置
(1)请求方法配置
是指在 request 以及 get、post 等别名方法中传入的配置
 axios({
   url: '/user'
 });
 axios.get('/user', {
   params: {
     page:1,
     limit:2
   }
 })
 ...
(2)实例化配置
我们还可以通过实例化的时候传入基础配置(我们可以把某些请求公用的配置在实例化的时候传入)
 let newRequest = axios.create({
   baseURL: 'http://localhost:9999'
 });
(3)全局(默认)配置
axios 还有一组默认配置项,如果实例化的时候没有传入或者 axios 默认导出的那个实例化使用的就是默认配置。
 // 默认配置 可以通过 axios.defaults 来获取
 axios.defaults.baseURL = 'http://localhost:8888';
 axios.get('/user');
配置优先级
请求配置 > 实例配置 > 默认配置
(四)拦截器的应用与实现
在 axios 中有一个类似中间件的机制用来在 request 方法请求之前和响应以后(用户代码执行之前)去处理一些任务。
// 添加请求拦截器
axios.interceptors.request.use(function (config) {
    // 在发送请求之前做些什么
    return config;
  }, function (error) {
    // 对请求错误做些什么
    return Promise.reject(error);
  });

// 添加响应拦截器
axios.interceptors.response.use(function (response) {
    // 2xx 范围内的状态码都会触发该函数。
    // 对响应数据做点什么
    return response;
  }, function (error) {
    // 超出 2xx 范围的状态码都会触发该函数。
    // 对响应错误做点什么
    return Promise.reject(error);
  });
拦截器实现
拦截器的实现是比较简单的,本质上就是类似中间件数组,一共有两组:请求、响应。通过统一模型,构造统一控制器管理拦截器的注册、注销、执行。
// Axios.js
function Axios(instanceConfig) {
   this.defaults = instanceConfig;
   // 这里创建的请求和响应拦截器 通过统一的类构造出来的
   this.interceptors = {
     request: new InterceptorManager(),
     response: new InterceptorManager()
   };
 }

// core/InterceptorManager.js
function InterceptorManager() {
  this.handlers = [];
}
// 添加拦截器 添加成功、失败回调
InterceptorManager.prototype.use = function use(fulfilled, rejected, options) {
  this.handlers.push({
    fulfilled: fulfilled,
    rejected: rejected,
    // 默认情况下它们被假定为异步的 如果您的请求拦截器是同步的,可以通过这个参数默认配置,它将告诉 axios 同步运行代码并避免请求执行中的任何延迟。
    synchronous: options ? options.synchronous : false,
    // 如果要基于运行时检查执行特定拦截器,可以通过这个runWhen这个参数,类型为函数
    runWhen: options ? options.runWhen : null
  });
  return this.handlers.length - 1;
};

// 注销指定拦截器
InterceptorManager.prototype.eject = function eject(id) {
  if (this.handlers[id]) {
    this.handlers[id] = null;
  }
};

// 遍历执行
InterceptorManager.prototype.forEach = function forEach(fn) {
  utils.forEach(this.handlers, function forEachHandler(h) {
    // 确定没被eject注销 才执行
    if (h !== null) {
      fn(h);
    }
  });
};

module.exports = InterceptorManager;
拦截器的执行原理
// Axios.js

 Axios.prototype.request = function request(config) {
   // 关键的链式调用
   // 链式调用存储数组 -- 请求数组
   var requestInterceptorChain = [];
   // 默认所有请求拦截器都为同步
   var synchronousRequestInterceptors = true;
   //遍历注册好的拦截器数组
   this.interceptors.request.forEach(function unshiftRequestInterceptors(interceptor) {
     // 这里interceptor是注册的每一个拦截器对象
     // axios请求拦截器向外暴露了runWhen配置来针对一些需要运行时检测来执行的拦截器
     // 例如:实现一个只有get方法才生效的拦截器
     //
     // function onGetCall(config) {
 		 //	   return config.method === 'get';
     // }
     // axios.interceptors.request.use(function (config) {
     //   config.headers.test = 'special get headers';
     //   return config;
     // }, null, { runWhen: onGetCall });
     //
     // 如果配置了该函数,并且返回结果为true,则记录到拦截器链中
     // 反之则直接结束该层循环
     if (typeof interceptor.runWhen === 'function' && interceptor.runWhen(config) === false) {
       return;
     }

      // interceptor.synchronous 是对外提供的配置,可标识该拦截器是异步还是同步 默认为false(异步)
    // 这里是来同步整个执行链的执行方式的,如果有一个请求拦截器为异步 那么下面的promise执行链则会有不同的执行方式
     synchronousRequestInterceptors = synchronousRequestInterceptors && interceptor.synchronous;

     //将interceptor.fulfilled, interceptor.rejected加入chain开头
     requestInterceptorChain.unshift(interceptor.fulfilled, interceptor.rejected);
   });

   //链式调用存储数组 -- 响应数组
   var responseInterceptorChain = [];
   this.interceptors.response.forEach(function pushResponseInterceptors(interceptor) {
     //将interceptor.fulfilled, interceptor.rejected加入chain末尾
     responseInterceptorChain.push(interceptor.fulfilled, interceptor.rejected);
   });

   var promise;

   // 如果为异步 其实也是默认情况
   if (!synchronousRequestInterceptors) {
     //dispatchRequest方法在适配器部分讲解
     var chain = [dispatchRequest, undefined];
     // 请求拦截器塞到前面
     Array.prototype.unshift.apply(chain, requestInterceptorChain);
     // 响应拦截器塞到后面
     chain.concat(responseInterceptorChain);
 			//chain = [fulfilled[1],rejected[1],fulfilled[0],rejected[0],dispatchRequest, undefined,fulfilled[3],rejected[3],fulfilled[4],rejected[4]]
     promise = Promise.resolve(config);
     while (chain.length) {
			// (fulfilled,rejected) 每次一组两个
      // shift:从数组中删除第一个元素,并返回该元素的值。此方法更改数组的长度。
       // 每次promise都会被重新赋值
       promise = promise.then(chain.shift(), chain.shift());
     }

     return promise;
   }

   // 这里则是同步的逻辑
   var newConfig = config;
   // 请求拦截器一个一个的走
   while (requestInterceptorChain.length) {
     var onFulfilled = requestInterceptorChain.shift();
     var onRejected = requestInterceptorChain.shift();
     try {
       //每次拿到最新的config
       newConfig = onFulfilled(newConfig);
     } catch (error) {
       onRejected(error);
       break;
     }
   }
 	 // 到这里 微任务不会过早的创建
   // 也就解决了 微任务过早创建、当前宏任务过长或某个请求拦截器中有异步任务而阻塞真正的请求延时发起问题
   try {
     promise = dispatchRequest(newConfig);
   } catch (error) {
     return Promise.reject(error);
   }
   // 响应拦截器执行
   while (responseInterceptorChain.length) {
     promise = promise.then(responseInterceptorChain.shift(), responseInterceptorChain.shift());
   }

   return promise;
 }
拦截器的应用
 // 添加请求拦截器
 axios.interceptors.request.use(function (config) {
     // 发送 token
     try {
       let token = localStorage.getItem('token');
       config.headers.authorization = token;
     } catch(e){}
     return config;
   }, function (error) {
     return Promise.reject(error);
   });

 // 添加响应拦截器
 axios.interceptors.response.use(function (response) {
     console.log('请求日志', response);
     return response;
   }, function (error) {
     console.log('请求日志', response);
     alert('出错了');
     return Promise.reject(error);
   });
(五)适配器
在浏览器中我们使用 XMLHttpRequest 提供的 API 来发送请求,在 Node.js 端我们需要使用 http 模块提供的 API 来发送请求,他们在底层提供的 API 结构包括针对响应数据的格式包装也不并不一致。那么 axios 为了能够解决这种差异,让使用者在不同的环境下使用统一的 API ,就采用了适配模式。

经典的设计模式:适配器模式应用。
function getDefaultAdapter() {
  var adapter;
  // 判断XMLHttpRequest对象是否存在 存在则代表为浏览器环境
  if (typeof XMLHttpRequest !== 'undefined') {
    // For browsers use XHR adapter
    adapter = require('./adapters/xhr');
    // node环境 使用原生http发起请求
  } else if (typeof process !== 'undefined' && Object.prototype.toString.call(process) === '[object process]') {
    adapter = require('./adapters/http');
  }
  return adapter;
}


function dispatchRequest(config) {
	// 提前取消请求
  throwIfCancellationRequested(config);

  // 赋个默认值
  config.headers = config.headers || {};

  // 转换数据
  config.data = transformData.call(
    config,
    config.data,
    config.headers,
    config.transformRequest
  );

  // 合并headers配置
  config.headers = utils.merge(
    config.headers.common || {},
    config.headers[config.method] || {},
    config.headers
  );
  // 删除多余的被合并过的数据
  utils.forEach(
    ['delete', 'get', 'head', 'post', 'put', 'patch', 'common'],
    function cleanHeaderConfig(method) {
      delete config.headers[method];
    }
  );
  // 适配器 axios是可以支持node端也支持浏览器端的
  var adapter = config.adapter || defaults.adapter;
  // 执行请求
  return adapter(config).then(function onAdapterResolution(response) {
    // 提前取消请求情况
    throwIfCancellationRequested(config);
    // 做数据转换
    response.data = transformData.call(
      config,
      response.data,
      response.headers,
      config.transformResponse
    );
    return response;
  }, function onAdapterRejection(reason) {
    if (!isCancel(reason)) {
      throwIfCancellationRequested(config);
      // 做数据转换
      if (reason && reason.response) {
        reason.response.data = transformData.call(
          config,
          reason.response.data,
          reason.response.headers,
          config.transformResponse
        );
      }
    }
    return Promise.reject(reason);
  });
};
./adapters/xhr.js 则是对原生ajax XMLHttpRequest对象的的封装,
./adapters/http.js 则是对node http模块的封装,也会针对https做相应处理。
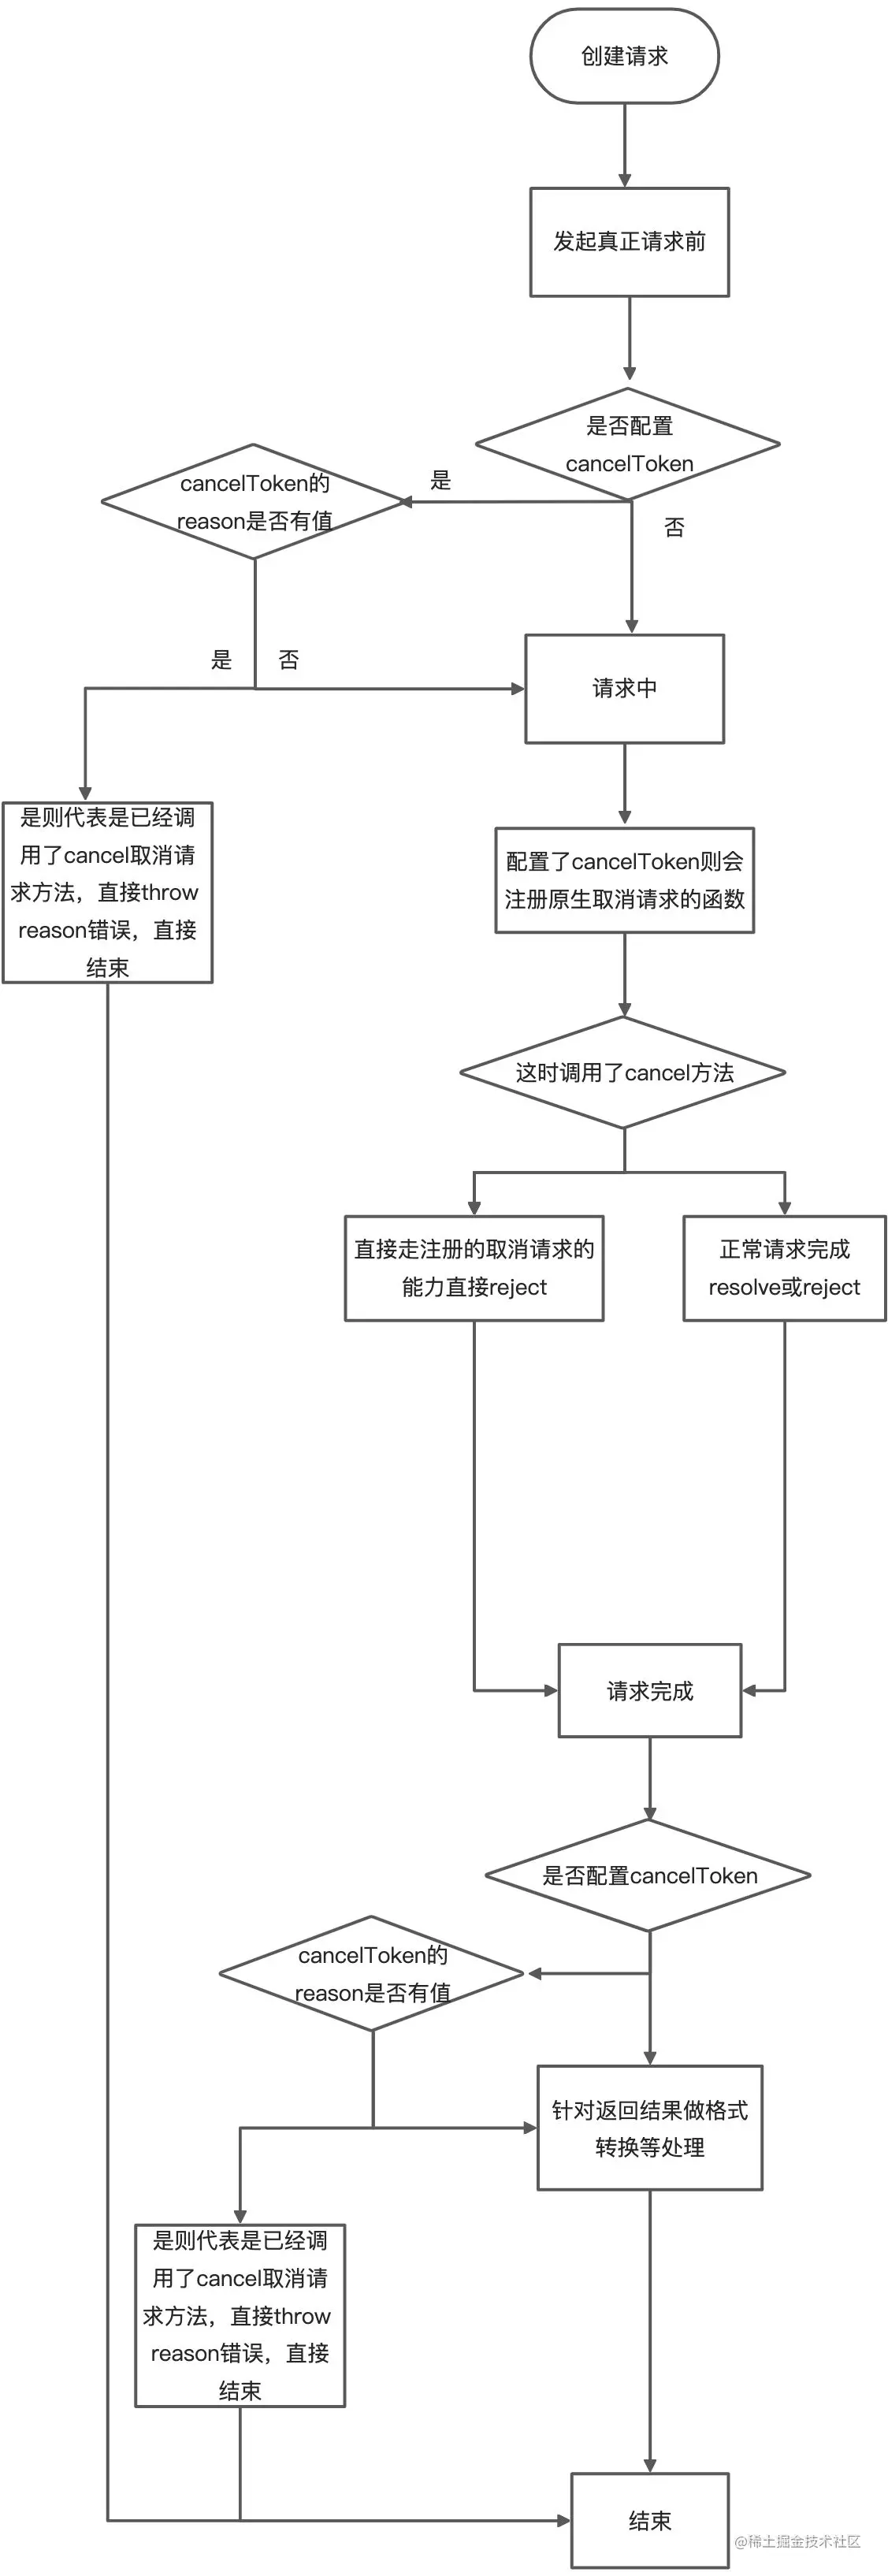
(六)取消请求
在lib/axios.js axios实例对外抛出了三个取消请求的相关接口,我们来看一下涉及取消请求的是三个文件,在 /lib/cancel/ 中 , 分别的作用:
1.CanceledError.js : CanceledError函数(伪造类),接受参数message其实就是调用source.cancel()中的参数:取消信息 ,原型对象上的__CANCEL__ 属性,是为了标识改请求返回信息为取消请求返回的信息
2.CancelToken.js :CancelToken提供创建token实例注册取消请求能力及提供取消请求方法
3.isCancel.js :用于判断是为为取消请求返回的结果,也就是是否是Cancel实例
- source方法
// 暴露出token 和 cancel取消方法
CancelToken.source = function source() {
  var cancel;
  // 构造CancelToken 的实例,实例上有两个属性一个promise一个reason
  // 同时把注册的回调函数的参数也是个函数把这个函数的执行权抛使用者调用(cancel)
  var token = new CancelToken(function executor(c) {
    cancel = c;
  });
  return {
    token: token,
    cancel: cancel
  };
};
source方法返回的对象中有两个属性:token 为 new CancelToken的一个实例,cancel 是 new CancelToken 时候函数executor的一个参数,用来在需要的时候调用主动取消请求。我们来分析下CancelToken的源代码。
function CancelToken(executor) {
  // 类型判断
  if (typeof executor !== 'function') {
    throw new TypeError('executor must be a function.');
  }
  // 创建一个promise的实例
  var resolvePromise;
  this.promise = new Promise(function promiseExecutor(resolve) {
  // 把resolve方法提出来 当resolvePromise执行时,this.promise状态会变为fulfilled
    resolvePromise = resolve;
  });
  // 存一下this
  var token = this;
  // new CancelToken时会立即调用executor方法 也就是 会执行source方法中的cancel = c;
  // 这里也就是把cancel函数暴露出去了,把取消的时机留给了使用者 使用者调用cancel时候也就会执行函数内的逻辑
  executor(function cancel(message) {
    // 请求已经被取消了直接return
    if (token.reason) {
      return;
    }
		// 给token(可就是当前this上)添加参数 调用new Cancel构造出cancel信息实例
    token.reason = new Cancel(message);
    // 这里当主动调用cancel方法时,就会把this.promise实例状态改为fulfilled,resolve出的信息则是reason(new Cancel实例)
    resolvePromise(token.reason);
  });
}
在adapter中的操作
当我们调用了cancel方法后,我们在请求中是如何进行中断/取消请求的。在适配器中这样一段代码可以找到想要的答案。
// 判断使用者在改请求中是否配置了取消请求的token
if (config.cancelToken) {
  // 如果配置了则将实例上的promise用.then来处理主动取消调用cancel方法时的逻辑
  // 也就是说如果ajax请求发送出去之前,这时我们已经给cancelToken的promise注册了.then
  // 当我们调用cancel方法时,cancelToken实例的promise会变为fulfilled状态,.then里的逻辑就会执行
  config.cancelToken.promise.then(function onCanceled(cancel) {
    if (!request) {
      return;
    }
    // 调用 原生abort取消请求的方法
    request.abort();
    // axios的promise实例进入rejected状态 这里我们可以看到主动取消的请求是catch可以捕获到
    reject(cancel);
    // request置为null
    request = null;
  });
}
// 真正的请求在这时才发送出去!!!
request.send(requestData);
上面是我们axios在请求中,中断请求的方式,那其他的情况下,请求前、请求完成后也是可以提前去做取消的逻辑的,这样也可以避免多余请求发送和不必要的逻辑执行,我们来看下是怎么做的吧。我们先看下CancelToken原型上的throwIfRequested方法:
// CancelToken原型上有个么一个方法 很简单就是直接抛错 将reason抛出
// reason则是根据调用cancel函数的参数 new Cancel的实例
CancelToken.prototype.throwIfRequested = function throwIfRequested() {
  if (this.reason) {
    throw this.reason;
  }
};
在我们的核心请求方法dispatchRequest中:
直接抛错,代表会将axios构建的promise实例状态直接置为rejected,所以直接就走.catch的逻辑了
// 判断如果配置了取消请求的token则就抛出
function throwIfCancellationRequested(config) {
  if (config.cancelToken) {
    // 调用抛出错误的方法
    config.cancelToken.throwIfRequested();
  }
}

module.exports = function dispatchRequest(config) {
  // 请求前
  throwIfCancellationRequested(config);
  // ... 省略代码
  // 请求中的在上面adapter中
  return adapter(config).then(function onAdapterResolution(response) {
    // 请求完成后
    throwIfCancellationRequested(config);
    // ... 省略代码
  }, function onAdapterRejection(reason) {
    // 请求完成后
    if (!isCancel(reason)) {
      throwIfCancellationRequested(config);
      // ... 省略代码
    }
    return Promise.reject(reason);
  });
};
我们就在axios请求在catch中通过isCancel方法判断这个异常是不是取消请求抛出来的,也就是判断他是不是Cancel实例, 从而做相应处理。
(七)写在最后
文中如有错误,欢迎大家在评论区指正,如果这篇文章帮助到了你,欢迎点赞👍和关注❤️
内容参考(感谢):
文章持续更新中~欢迎关注我的掘金和github~